Friday, June 27, 2014

About Red Cabbage (with recipes)

Choose the best red cabbage by selecting one that feels heavy, is bright and has crisp leaves. Avoid any that have puffy leaves or outer layers removed.
  • Red cabbages are easy to prepare.  Strip off the outer leaves, wash, then slice into quarters, cut out the hard central core on each, then chop or shred.
  • Lock in the color by adding a touch of vinegar when cooking red cabbage in water. This stops the lovely deep purple hue from running.
  • Don’t be too heavy-handed with red cabbage. A lot of its frumpy reputation comes from it being over-pickled or boiled for an eon. Although it’s a sturdy vegetable it’s not invincible…
  • Go raw. Lock in nutrients by eating your red cabbage uncooked in salads. Just make sure you slice it very finely. 

Here are some suggestions for what to do with your beautiful red cabbage! (This link "German Food" will also take you to a website with a number of red cabbage recipes.)


Pickled Red Cabbage  (This is a personal favorite)
Ingredients 
  • 1 lb red cabbage, finely shredded
  • 1 1/4 Tbs. coarse sea salt
  • 2 cups cider vinegar
  • 3/4 red wine
  • 1 1/4 granulated sugar
  • 2 tsp black peppercorns
  • 6 bay leaves
  • 2 tbsp yellow mustard seeds
1. Place the shredded cabbage in a colander over the sink and sprinkle with salt. Leave for 2-3 hours, then drain and wash away the salt. Pay dry with a clean tea towel.
2. Put the vinegar, wine, sugar, peppercorns and bay leaves into a big, wide saucepan and simmer until the liquid has reduced by about half. Set aside for 10 mins to infuse.
3. Strain through a fine sieve (cheesecloth works, too)into a jug or bowl, and discard the peppercorns and bay leaves. Put the cabbage and mustard seeds into a big bowl, and then pour the strained liquid over. Transfer the cabbage and pickling liquid into sterilized jar(s) and seal. Will last for a month in the fridge


"Purple Stuff" Red Cabbage Rolls
Ingredients
  • 1 large red cabbage
  • 2 lb lean ground beef
  • 2 large onions, chopped
  • 2 medium green bell peppers, chopped
  • 2 medium red bell peppers, chopped
  • 2 medium yellow bell pepper, chopped
  • 1 Tbsp garlic, minced
  • 1 c brown rice, cooked
  • 1/2 c stove top stuffing  ( or use bread crumbs made with fresh bread instead of dry)
  • 2 can(s) tomato soup
  • 1 can(s) chicken broth
  • 1 c tomato juice 
  • 1 can(s) mushroom pieces
  • garlic pepper season to taste
  • salt season to taste
  • 2-3 dash(es) Worcestershire sauce
Directions
1. Prep day before you plan to cook these: Leave your red cabbage in the plastic bag and place in the freezer. Leave in for 12 hours or overnight. Remove and leave to thaw at room temperature. The leaves will be soft and easy to use without having to boil them.
2. Cook the rice and set aside to cool.
3. In light olive oil, saute onions, mushrooms, and peppers until the onions are golden brown and set aside to cool.
4. In a large bowl, add the ground beef, add the salt, garlic pepper, Stove Top stuffing, Worcestershire sauce, sauteed onions and the rice. Mix together until combined.
5. Remove the leaves from the cabbage, cutting away the tough part closest to the core in the shape of a V. Spray your large casserole or two small casserole dishes with cooking spray.
6. Put about a 1/3 to 1/2 cup meat mixture at the bottom of the leaf, tuck in your corners at the "V" and roll up tightly. The meat amount will vary depending on the size of the leaf. Repeat until all the meat is used up or all leaves are gone. If you have any meat mixture leftover, freeze it for later.
7. In a large mixing bowl combine the tomato soup, juice, and broth. Pour evenly over the cabbage rolls. Cover with foil.
8. Bake the cabbage rolls at 325 for two hours.
Thursday, June 26, 2014

APRICOT MELBA

APRICOT MELBA
(This recipe is like the classic Peach Melba but using apricots.)  It is apricot season, so this would make a good stand in, until peaches start coming in. And the good news is, this could not be easier.

Ingredients
1 cup sugar
2 cups water
1/4 cup lemon juice
1 lemon, zested
12 ripe, firm apricots, pitted, or 3 peaches, halved and pitted
1/2 pint vanilla ice cream

Raspberry Sauce:
1 pound raspberries
1 cup sugar
2 tablespoon lemon juice
Garnish:
2 cups heavy cream, whipped
1 cup sliced almonds, toasted
Directions
In a medium saucepan, prepare syrup. Bring the sugar, water, lemon juice and zest to a boil. Lower to a simmer and cook for 10 minutes.

Poach apricots or peaches until tender. (Tip: if you use peaches, remove the skin.) Let them cool in the syrup.

To prepare raspberry sauce, in a blender, combine the raspberries, sugar and lemon juice. Process to a puree.

Remove fruits from syrup.

To serve: In a small bowl, place a scoop of vanilla ice cream, place the fruit on top, and cover with raspberry sauce. Garnish with whipped cream and toasted almonds.

This was made with Nectarines, not apricots but peaches, nectarines, apricots....all yummers!


Monday, June 23, 2014

Carrot Halwa

Carrot Halwa is probably one of my favorite sweets.  This particular recipe is one I have used and it has never disappointed me.  It may look a bit daunting for novice cooks but once you get the basics down, you can experiment with your own version. I added mace and a little powdered cardamom the last time I made it. The addition of pistachios sounds pretty good, too. And I don't have a pressure cooker, I just used a pot on the stove with a tight fitting lid. I just followed the basic steps and it came out fine.

~Suzanne

GAJAR KA HALWA (CARROT HALWA) RECIPE


Ingredients:
  • 4 cups of grated carrots, packed
  • 2 cups of milk
  • 1.5 cups of water
  • 1/3 cup of sweetened condensed milk
  • 1 tbsp of ghee
  • 12 cashew nuts
  • 10 raisins
  • 3 pods of cardamom, powdered

How to Make Gajar ka Halwa:


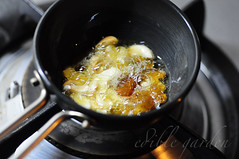
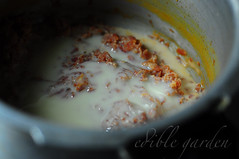
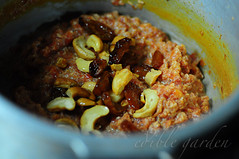
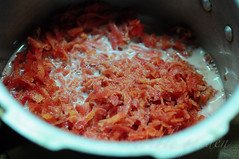
1. Add the grated carrots, milk and water to a pressure cooker pan. Mix well and pressure cook for 2 whistles - about 7-8 mins. Turn off flame and let the steam release on its own.
gajar ka halwa-carrot halwa recipe

2. Meanwhile, heat the ghee and fry the cashew nuts and raisins until golden. Set aside.
gajar ka halwa-carrot halwa recipe

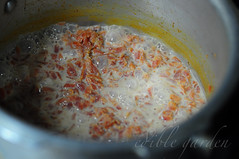
3. Once the pressure cooker is ready to be opened, turn on flame again and keep it on low. Bring the carrot milk mixture to boil again and continue to cook on low flame for 10-15 mins...
gajar ka halwa-carrot halwa recipe

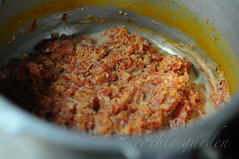
... until the mixture thickens and the milk becomes a bit grainy.
gajar ka halwa-carrot halwa recipe

4. Add the condensed milk and mix well. Let it cook for another 2-3 mins. Adjust the amount of condensed milk to suit your sweetness levels. I didn't add any sugar or other sweeteners beyond this.
gajar ka halwa-carrot halwa recipe

5. Next add the roasted cashew nuts and raisins and the ghee it was roasted in. Top up with the cardamom powder. Mix well. Taste test and make sure all is ok and remove from fire.
gajar ka halwa-carrot halwa recipe

Notes:
  1. Adding a few drops of vanilla instead of the cardamom would give it a different flavour that you may like
  2. Cool completely and chill if you want to serve it cold. The halwa stays fresh in the refrigerator for up to two days
  3. Adding pistachios instead of cashew nuts is a great option too.

Recipe from www.cookingandme.com

Beet Hummus Recipe

Beet Hummus Recipe

  • Yield: Makes 2 cups.
  • 1/2 pound beets (about 4 medium sized beets), scrubbed clean, cooked, peeled, and cubed*
  • 2 Tbsp tahini sesame seed paste
  • 5 Tbsp lemon juice
  • 1 small clove garlic, chopped
  • 1 Tbsp ground cumin
  • 1 Tbsp lemon zest (zest from approx. 2 lemons)
  • Generous pinch of sea salt or Kosher salt
  • Fresh ground pepper to taste
*To cook the beets, cut off any tops, scrub the roots clean, put them in a covered dish with about 1/4-inch of water in a 375°F oven, and cook until easily penetrated with a knife or fork. Alternatively, cover with water in a saucepan and simmer until tender, about 1/2 hour. Peel once they have cooled.

METHOD

Place all ingredients in a food processor (or blender) and pulse until smooth. Taste and adjust seasonings and ingredients as desired.
Chill and store in the refrigerator for up to 3 days or freeze for longer storage.
Eat with pita chips, or with sliced cucumber or celery, or on a crostini with goat cheese and shaved mint.

Note:  This didn't strike a chord with me when I first saw it but I gotta say, it really is tasty. Especially if you toss in that goat cheese option.  Yum!  ~Suzanne

Friday, June 20, 2014

Keeping Produce Safe

Food Handling and Safety Information: Keeping produce safe from food borne illnesses.


Once fruits and vegetables are picked they begin to lose their nutrients. While there is no way to avoid this loss, the produce you purchase from a local grower (that would be us) will almost always be as fresh as you can get unless you grew it yourself, and so can be much more nutrient dense. That is a big plus to buying locally since that the produce is generally picked right before you get it. It will also last longer than supermarket or trucked in produce. And you can easily increase the staying power of any of your vegetables by simply storing them properly.


One way to keep veggies fresher is to keep as much air away from the vegetables as possible once you get them home. Modern refrigerators have a very drying effect on foods exposed to the air in them and you want to avoid that. That is why there is a "crisper" or special drawer in your 'fridge to put produce in. If you are going to store your produce in plastic bags, try to get them as airtight as possible.


There are "GreenBags" that are specially made to prolong the life of veggies and can be a good idea for some things. They do tend to be hard to get completely clean when you wash them and can become contaminated themselves if stored too long. They really do work pretty well but you need to make sure you pay attention to how long you use them and replace them more often than the literature recommends.


Reusing grocery store plastic bags might seem like a really "green" way to recycle them but I don't know too many people who wash their plastic grocery bags before reusing them. The reality of reusing plastic grocery bags is that they can be grossly infected with bacteria from whatever was in them before. Things like meat and milk, purchased at the supermarket are rarely without potential for pathogens. Leaky packages, milk cartons that sit on shelves where spilled milk is present introduces these bacteria into the bag they are brought home from the market in. By putting something into that bag after it has been exposed, you are introducing that contamination to whatever you put in the bag. Seems like it should be simple common sense, yet people do this kind of thing all the time.


Being a strong steward of the environment I like the idea of alternatives to plastic use when possible.  You can buy or make organic cotton or hemp mesh bags that can be used to store veggies in the refrigerator, just like plastic.  They are completely washable and are far easier to remove possible contamination from this type of bag. There is also a special type of mesh fabric used to make this type of bag that absorbs moisture and keeps veggies hydrated without allowing them to dry out.  These types of bags are relatively easy to find (for purchase) and of course, you could make your own. Just do a little research about the type of fabric, like whether or not the fabric has been chemically treated, etc...so actually, it is probably easier to buy them.


Farm Direct versus Supermarket


The produce you get from our CSA will be many times cleaner than what you purchase at the supermarket, simply because there have been fewer opportunities for contamination to occur. Generally we  pick it bring it in from the field and pack it all within just a few hours, reducing the number of times it is handled and reducing the chance of it coming in contact with potential contaminants. As a certified organic grower, we were required to wash our bins using an acceptable procedure after each use, too. 


Keep in mind that hardly anything you get in your CSA share will have been washed nor is it ready to eat. At our farm, we do hydro-cool some of our field crops but not many. Hydro-cooling is merely a brief soaking in clean, cool water to lower the temperature quickly and to preserve freshness. We use the same water we drink for this process and we also have our water tested for pathogens and chemicals periodically.  You should still make sure to use practice safe food handling when using any produce, no matter the source.


Although washing produce with tap water is usually adequate, no washing method completely removes or kills all microbes which may be present on the produce. Since local produce comes from field directly to you, exposure to possible microbes can be reduced. Also, part of any organic certification requires the use of safe handling procedures which could further reduce the risks. 


To find information on the safe handling of meats or poultry, visit MeatSafety.org